
Welcome to A New Tutorial Blog!
First... some whining and rants :PComing from Borland Delphi (& Lazarus) and XCode experiences, learning Qt is something relatively new and uncomfortable. Tthe documentation is not newbie friendly. At all. And, there aren't many sites or blog that writes guide and code samples for complete newbies. They use simplified steps and missing out the crucial steps. Most tutorial sites speak non-newbie language. Even answers in forums are non-newbie-friendly.
Their answers are normally "find a book and read documentation yourself". This is totally opposite of what the XCode community is - who are mostly very generous in teaching others even down to the very basic of Objective C or Swift.
Qt community is rather unwilling to help newbies with their C++ and Qt knowledge so they won't entertain absolute noobs like me, even when it is easy to answer. Even in their "Newbie" forum they won't entertain us. Their answers are normally "find a book and read documentation yourself". This is totally opposite of what the XCode community is - who are mostly very generous in teaching others even down to the very basic of Objective C or Swift. You can ask very noob question in apple forum, about ObjC or swift or the IDE itself and many people will be happy to help with sample codes. I hang out in the iPhoneSDK forum and Apple Developer forum a lot so I know this to be true. There are no "smart aleck" who reply with "this is basic of C++ why don't you learn it read a book".
You can get some luck in StackOverflow with Qt, but there aren't many people who knows Qt there either (but I will be there for Qt from now on! Rejoice! XD). So here I am - using newbie languages to teach you how to do stuffs in Qt and give you hints and tips to help you create your application. I am NOT an expert on Qt though, since I myself am a noob in this, and my knowledge in C++ is also weak. But what I have learnt, I will share here in noob terms. :D
Introduction
Qt main SDK is Qt Creator. Inside Qt Creator you can create projects and also open UI files (ie Forms) through the Qt Designer. It is best to have 2 monitors to develop application these days. So you can have code in one screen and design the UI in the other. It makes developing job much easier. So first and foremost, you need to install Qt Creator kit in your windows PC. Easiest way is to use their online installer. Download it and run as admin, and everything will be taken care of. If you download Qt Creator via its Offline Installer, many things will not be set up - like Kits, Versions and Compiler so you need to do that manually. (I have no idea how at the moment unfortunately).
Creating a New Project
After you have installed Qt Creator (mine is v5.9), you can then create your first application.Goto File->New File or Project...
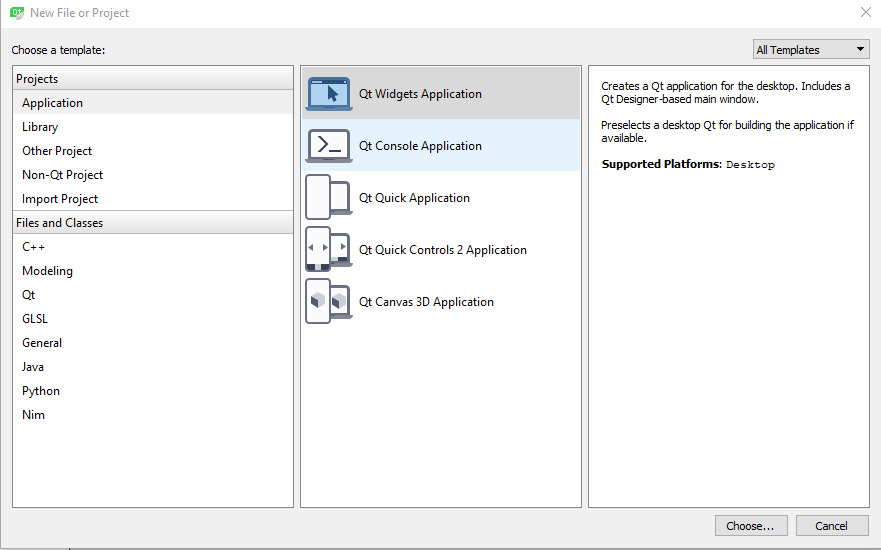
As you can see there are many templates and project types to choose from. Console application runs in DOS (command line). Widget and Quick application has windows (that normal floating box with minimze,maximize and close button at one corner) like normal windows application. So what is the difference between the two? Widget application is the typical windows software. Like Notepad or Excel. It uses standard components like Buttons, checkboxes, tables, etc. Quick app however uses Xml/json (in fact Qt named theirs QML) so it will behave more like a webpage. Good with animations and fancy looking. This tutorial will focus on Widget application. So lets select that.
At this point there will be a window asking you location of your project, and compiler and some other things, just click next until finish. Then you will end up with your new project opened. Open up all the project "groups" by unfolding them and you will see the files of your project:

All of these files you will use and edit except main.cpp. First, double click on First.pro and it will be opened in the editor in the right side. .pro is your project file (duhh obviously). In there you should see "QT += gui core" line. This is the line you would normally edit when you add Qt library such as serialport, opengl or others.
Example, adding serialport support
QT += core gui serialportNote this is the same as
QT += coreJust add the name separated by a space. How do we know the name of the library?? This is where the documentation comes in (probably that's the ONLY use of the documentation lol :D). If you open the library page, you will see:
QT += gui
QT += serialport

The documentation is a bit funny that way. QT += serialport is equivalent to adding the library module. So that should really be placed first before the #include info in this documentation. Logically, of course you have to link the library first, then only you can use (include) it.
For those who are familiar with XCode, these libraries are exactly like frameworks. But with Qt, there is a larger collection of libraries. For example, if in XCode you can directly use NSLog to debug in console, in Qt we need to include the corresponding class before using the equivalent of NSLog which is qDebug() command! The class is called QDebug. So you have to #include <QDebug> in your header to use it.
Take note that some class like QDebug is already included in the "core" or "gui" (not sure which), so you do not have add anything in your .pro file. You need to add "+= lib" if the class you want to use is not included in the default library (core, gui, line).
Designing The App
Lets design our first application. Lets make something more than the normal too basic and impractical Hello World. The Qt Hello World app example is just a Pushbutton that is added programatically as the Central widget. It sucks because it is too simple :D. But wait a minute, what the heck is a central widget?
Central widget is a QWidget object and it is the main container of all your widgets/components in the MainWindow.Lets make an app to add a simple contact data to a table. Firstly, lets design our UI. Right click on mainwindow.ui and select Open With...->Qt Designer as in photo below:

Another window will pop up with our main window UI form. Delete everything in there except central Widget. To delete, you need to select the object in Object Inspector on the right side panel and press Delete button on your keyboard.
Once it is an empty window, add 2 Labels, 2 Line Edits, 1 Table View at the bottom and a Push Button with title "Add". Design it to be something like in below photo:

1. User need to enter both Name and Number before allowing Add button to be pushed.
2. The Name and Number that has been added will display in the Table View in a new row.
In a real Contacts application, you can consider more things:
3. Make the Number text field to accept only numbers.
4. Make the data persistent by saving it into a database of somesort.
5. Able to search for a particular contact.
6. Adding of more fields like Photo, Email Addr, etc
7. Sorting of the table (by Name, by email, etc).
8. Able to Edit the contact data.
9. etc
But since this is a totally noob tutorial to familiarize ourselves with Slots, Widgets, setting up and so on, we'll just do the above two points.
Component/Widget's Naming
Once you've added the components/widgets as shown in photo above, you need to give them some meaningful names. In Designer, select a Line Edit, go find the property "objectName" as shown and rename them as you wish:

Here, I changed the name of the "Name" QLineEdit from lineEdit to nameEdit. I also changed the name for the "Number" QLineEdit from lineEdit_2 to numberEdit. And the "Add" QPushButton as addButton & finally the QTableView I named it contactsTable. Ctrl-S to save the ui.
Problem: After you have changed the name and saved the ui file, the changes are NOT reflected immediately on Creator for some ahem dumb reason hahaha. I needed to close Qt Designer and Creator and open them again to have it reflected in Qt Creator... if you find a way to update it do leave a comment below.
Events and Slots
If you are familiar with XCode, the way to connect a component's event like a button push action to a method, you simply wire up the IBAction. Or if in Delphi, you simply doubleclick the Button and the method will be created automatically. BUT, in Qt, everything needs to be done manually T_T. The term for a method that connects to a component in Qt is SLOTS.
As for our first requirement, we need to:
i) Disable add button upon startup.
As with all software development, there will be an entry point to the user interface. For our MainWindow, it is the Mainwindow constructor. So to set up any initial appearance and settings, we put the codes in this constructor:
MainWindow::MainWindow(QWidget *parent) :
    QMainWindow(parent),
    ui(new Ui::MainWindow)
{
    ui->setupUi(this);
    ui->addButton->setEnabled(false); // disable the Add button by inital
}
You may notice that we used ui-> to grab the button. This is the way to grab any object in our mainwindow - by referring to our ui. Similarly you can access the nameEdit by ui->nameEdit and numberEdit by ui->numberEdit. Easy eh? If you run the application now, you will see the Add Button is grayed out and unable to be pushed. But nothing else is happening. Lets do the next functionality - enabling the add button when there are data.
ii) detect when user is typing something in Name and Number text fields, and enable Add button once both of fields are not empty.
Now to use SLOTS, you need to write the slot function in our header file. Open mainwindow.h and enter as below below the Q_OBJECT directive:
private slots:
   void textEditChanged();
We need only create one method to handle both events of nameEdit and nameNumber. Next goto Designer and goto Edit->Edit Signals/Slots. Now click the nameEdit and hold and drag mouse to the MainWindow. You will see a "Ground" icon at your mouse and when you let go of mouse click, a Connection Configurator will pop up as below:

On the left side, are the SIGNALS methods/functions that is available to a Line Edit. What we want is textChanged since this is called everytime text is changed (by typing or deleting). So select that. Then on the right side, are the available SLOTS to connect. As you notice, the textEditChanged() that we declare in our header is not listed here! We need to add it manually. Click the Edit... button at the bottom, and in the Slots listings, click + button and manually type our function name textEditChanged() and click Ok. Once you return to the configurator window, our Slot textEditChanged will be there, select it and click Ok. (Ensure textChanged(QString) was selected on the left panel). Then click Esc button on keyboard to exit Slots/Signals editing. Then save your ui file.
Now time to write the Slot codes in our cpp file. Open mainwindow.cpp, and enter the following:
void MainWindow::textEditChanged() {
  QString nameStr = ui->nameEdit->text();
  QString numberEdit = ui->numberEdit->text();
  if ((nameStr.length()>0)&&(numberEdit.length()>0)) {
    ui->addButton->setEnabled(true);
  } else {
    ui->addButton->setEnabled(false);
  }
}
It is a simple code. We take the texts in both LineEdits and store it in QString. Then we check for the length of both of them. If both are more than 0, that means both Name and Number has been entered and therefore we enable the Add button. If not, disable it. Now if you run the application, you can key in something in the LineEdits and observe the Add button being automatically enabled/disabled accordingly.
Next we can implement the addition of data into the TableView by pushing Add button:
Model/View Architecture
Similar to XCode and perhaps others SDK, model-view architecture is typical to display any data in a items-displaying component such as QListView, QTableView or QTreeView. For Qt such model is called QStandardItemModel. QStandardItemModel inherits from QAbstractItemModel which is the basic interface. You can sub class QAbstractItemModel if you need your own model. For now we will use QStandardItemModel, where it holds QStandardItem. Types of QStandardItem are text, icons, or checkboxes. If you want other things, you may need to subclass QStandardItem.
Types of QStandardItem are text, icons, or checkboxes.Model-View concept works by user updating only in the Model, and the view will then auto arrange and update itself based on the Model. It is a good concept to display multiple data in a list/table.
So by knowledge of QStandardItemModel and Model-View, what we need to do now is have a global QStandardItemModel and link the model to our view which is contactsTable. We also need to keep track of the total of contacts data that we have, so declare the following in our header:
private:
    Ui::MainWindow *ui; // default declaration for ui
    QStandardItemModel* listModel; // our contacts model
    int totalContacts; // to keep track of number of items user have added
    totalContacts = 0; // initialize it as 0
    listModel = new QStandardItemModel(0, 0, this); // initialize an empty model
    listModel->setHorizontalHeaderLabels(QStringList{"Name","Number"}); // set the header label of this model.
    ui->contactsTable->setModel(listModel); // here is the assigning to our tableview.
    ui->contactsTable->horizontalHeader()->setSectionResizeMode(QHeaderView::Stretch); // to make the table cells stretch/fill across the tableview width.
If you run the application now, you will see as below:

We're almost there!
Final thing to do is to add SLOT for our Add button (clicked() signal) and write code for adding data from the LineEdits into our model (and hence will be auto updated in the TableView). Using same steps as before add the Slot for buttonPressed(). Then the code for addBtnPressed() are as follows:
void MainWindow::addBtnPressed() {
    QStandardItem *item1 = new QStandardItem(ui->nameEdit->text());
    QStandardItem *item2 = new QStandardItem(ui->numberEdit->text());
    listModel->setItem(totalContacts,0,item1);
    listModel->setItem(totalContacts,1,item2);
    ui->nameEdit->setText("");
    ui->numberEdit->setText("");
    totalContacts ++;
}
From code: The code is self-explanatory i think. Each item in the model is represented by QStandardItem. Since we are storing 2 data in each contact (name and phone number), we need 2 QStandardItems and they are set by using setItem function of the model. After that we clear the LineEdits, ready to be input by users. Finally we increment totalContacts by 1.
If you run the application, you can now add Contacts to the tableview. Yay!! It's done! Check out the application in action. Added 2 ambiguous data.

Now, maximize your application by click the maximize box on the top right hand side.

LOL!
Now, this is therefore a topic for our next tutorial. Meanwhile, you have completed your first Qt windows application. Congratulations!


No comments:
Post a Comment